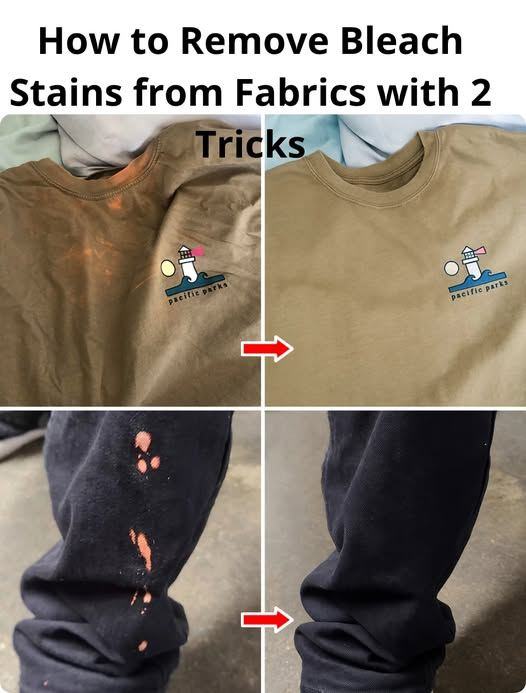
Here’s a practical guide to removing bleach stains from fabrics using two easy tricks. Keep in mind: bleach actually removes color, so these methods work best for salvaging the look of your fabric, not restoring the original color perfectly.
Trick 1: Use a Fabric Dye or Marker
Step 1: Identify the Fabric Color
- Match a fabric dye, permanent marker, or fabric paint as close as possible to the original color.
Step 2: Apply Carefully
- Test on a small hidden area first.
- Use a cotton swab, brush, or marker to color in the bleached spots.
Step 3: Let It Dry
- Allow the fabric to dry completely, then heat-set if needed (iron on low without steam) to make the color permanent.
Trick 2: Turn the Stain Into a Design (Creative Approach)
Step 1: Dilute Bleach (Optional)
- For a more uniform look, lightly dilute bleach and apply to small areas to create a pattern (like polka dots or tie-dye effect).
Step 2: Rinse & Neutralize
- Rinse thoroughly with cold water and use a small amount of vinegar to neutralize leftover bleach.
Step 3: Air Dry
- Let the fabric dry. Now the “stain” looks intentional, turning an accident into a fashion statement!
Extra Tips
- Act quickly: The sooner you treat a bleach stain, the better.
- Avoid rubbing aggressively: It can damage the fabric fibers.
- Consider color-safe bleach: For future use, it won’t leave permanent white spots.
✅ Key Takeaway
👉 Bleach stains can’t always be fully erased, but you can either color them in or turn them into a creative pattern. Both tricks are quick and effective ways to salvage your favorite fabrics.
If you want, I can also give a 3rd trick using hydrogen peroxide or baking soda to fade the white spot on dark fabrics—it’s surprisingly effective!
Do you want me to share that?
